No school today for President's Day so Matt and I had a nice brunch when I got back from the fitness center and a hair appointment.
Now, this is going to sound contradictory - fitness center and brunch (not a healthy one at that), but come on, you can't eat healthy EVERY minute of the day, it just doesn't work.
So, if you're looking for a healthy breakfast, this is not your recipe. If you're looking for a quick and tasty breakfast, this is your recipe! If you're looking for a new idea that can be altered to your specific tastes, this is also your recipe!
Waffle Iron Brunch - (sorry no pictures)
Hash browns on the waffle iron is a fantastic idea! You can add whatever you want - onions, peppers, cheese, etc.
We made frozen hash browns with cheese and seasoning. Spray the hot waffle iron with cooking spray to prevent sticking. Add a handful of hash browns, season, and add cheese. Add a few more hash browns to cover the cheese and tightly close the waffle iron. Cook for a few minutes until browned and slightly crispy.
Cinnamon rolls on the waffle iron is another fantastic idea! Takes a lot less time than the oven! Place 2-4 of your favorite refrigerated cinnamon rolls on a hot, sprayed, waffle iron. Tightly close and cook a few minutes until cinnamon rolls are lightly browned. Serve with the frosting that comes with the rolls or with maple syrup or both!
Now don't go making this breakfast/brunch every day, or every week, probably not good to do that - but do enjoy it every once in awhile - we did!
Monday, February 20, 2012
Sunday, February 12, 2012
Homemade Chinese!
It was quite the Friday at school, and honestly, quite the week at school so I needed something to kick the weekend off on a good foot. Matt left for an Augustana Basketball game so I had the house to myself! - including the kitchen, living room, and TV! I decided to try a new Chinese recipe. We make a lot of stir fry's and such, and this is a take off a recipe I found in one of my Taste of Home Magazine. Of course I added some things and replaced some things, and it turned out great!
What a wonderful start to the weekend!


Cashew Chicken with Noodles
1 lb boneless skinless chicken breast, cut into pieces
2 Tbsp cornstarch
3 Tbsp minced garlic
1/4 cup soy sauce
1 Tbsp peanut oil
1 Tbsp sesame oil
1 cup chopped celery
1 cup chopped cabbage
6 green onions, cut into 2 inch pieces
1 pkg Rice Noodles - thick would be better, but I only found the "rice stick" thin noodles
3 Tbsp Teriyaki marinade (the recipe called for chili sauce but we were out)
1 cup unsalted cashews
Combine cornstarch, minced garlic, and soy sauce in medium bowl. Add chicken and stir to coat. Heat peanut and sesame oil in large skillet and add chicken mixture. Cook until chicken is just about done, then add celery and cabbage - cook until chicken is done. Meanwhile, cook noodles according to package directions. Add green onions to chicken skillet and cook additional minute. Then, add cooked noodles, marinade, and cashews - heat through. Be sure to turn the noodles so they get completely covered in chicken mixture and marinade.
I used cabbage and celery because it's what we had in the fridge and it's my 2 favorite stir fry vegetables, but you may omit these or add something else - like water chestnuts or carrots or broccoli.
I also need to talk about these new bowls I bought from World Market - aren't these perfect!!?? The Yin and Yang bowls are perfect for our Chinese dishes! :)


Another Pinterest Find - S'more Cookies
Made these cookies for Super Bowl Sunday and they were a huge hit! I've made s'more bars before but these cookies are something different. The batter is very sweet with Honey Graham Crackers in it.
I actually cut the recipe in half when I made the cookies and it still made about 2-3 dozen.

S'more Cookies
3 sticks cold butter, sliced
1 cup sugar
1-1/2 cups brown sugar
2 eggs
2 tsp vanilla
4 cups flour
2 cups graham cracker crumbs(I used the honey kind)
1 tsp salt
1 tsp baking soda
mini marshmallows
2 giant size chocolate bars (I used Hersey, but you could use anything)
Heat oven to 375. Combine the butter and both sugars. I did not soften the butter like I usually do and just beat it in the mixer to combine. Mix in egg and vanilla until well combined. Add flour, graham cracker crumbs, salt, and baking soda. Place dough in balls on cookie sheet covered with parchment paper. Bake for 8min, remove from oven, press in chunks of chocolate and marshmallows. Put back in oven and back an additional 3min. Let cool.
Friday, February 10, 2012
Italian Dinner with Dessert
I found this recipe on Pinterest awhile ago and was waiting for a time when I needed to feed a few people in order to try the recipe. The recipe on Pinterest has a great video tutorial that's really helpful for the Chicken Parmesan. I really recommend watching it while you're cooking!
http://foodwishes.blogspot.com/2008/02/end-of-chicken-parmesan-as-you-know-it.html
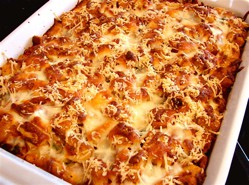
Baked Chicken Parmesan
2 Tbsp Olive Oil
2 Tbsp minced garlic
Hot Red Pepper Flakes (I used a Hot and Spicy Mix I found at World Market)
6 boneless skinless chicken breasts, or as many as fit in your baking dish
2 cups marinara sauce
1/4 cup chopped basil - I used about 2 tsp dried basil because I didn't have any fresh
8 oz shredded mozzarella
4 oz Parmesan cheese
1 pkg garlic croutons (5oz)
Preheat oven to 350. Mix the oil and garlic at the bottom of a 9 x13 baking dish - spread evenly out. Sprinkle in some red pepper flakes - you don't have to do this if you don't like the heat. Lay your chicken breasts in the baking dish and evenly cover with marinara sauce. Sprinkle with chopped basil. Add about half of your mozzarella and parmesan cheese followed by the croutons and the rest of the cheese.
Bake for 35-45 minutes or until thermometer in chicken read 150 (I think - maybe it's 170...I can't remember what chicken should be - check the tutorial I pasted above)


And of course, with the Baked Chicken Parmesan, I had to serve garlic bread. :)
This bread was fairly simple to make compared with some of the breads I have made. It does need to time to rise so I baked it the night before I made this dinner, and then warmed it in the oven right before dinner with the cheese.
Cheesy Garlic Bread
1 cup warm water
1 Tablespoon Honey
1 envelope Active Dry Yeast (2 1/4 Teaspoons) - I would recommend using the Quick Rise Yeast - just works better!
1 teaspoon Salt
3 cups Bread Flour
Olive Oil, For Greasing Surfaces (I just used the cooking spray)
⅓ pounds Sharp White Cheddar, Or Any Other Cheese You Prefer (I recommend this kind - or mozzarella/Parmesan works too!)
½ cups Garlic Butter (I made my own with melted butter and minced garlic, then I added a little Parsley and Basil)
In a large bowl, stir water, honey and yeast together. Let yeast proof 5 minutes - unless you're using the Quick Rise Yeast, then it doesn't need to proof. Once you know yeast is active, stir in salt and the flour in 1/4 cup increments. If you are using a stand mixer, be sure to not increase your speed higher than a 2 or ‘stir’. Once dough starts pulling away from the sides and the bowl seems to be pretty clean, set a timer for 5 minutes and walk away. Let the machine knead the dough. After 5 minutes, dough should be smooth and tacky but when touched shouldn’t leave any dough on your fingers.
Grease the bowl and the dough. Cover with plastic wrap or a kitchen towel and let rise 1 hour or until doubled in size.
Punch down dough and cut into two equal portions. Form into two long baguettes the length of the cookie sheet. I like to twist mine because it looks cool, but it also keeps its length and doesn’t shrink. Cover with plastic wrap and rise 30 minutes. Start to preheat oven to 400 degrees F and place dough close to the oven where it’s nice and warm. Once oven is preheated, remove plastic wrap, from the dough reduce oven to 350F, put the bread into the oven and bake 20 minutes.
In the meantime, slice the cheese into thin slices and melt the butter.
Pull loaves of bread out of the oven after 20 minutes and brush with the melted garlic butter. Bake another 5-7 minutes or until bread begins to turn a golden brown. Remove from oven and cool 15 minutes.
Cut 1-inch slices 3/4′s of the the way through the loaves. Brush garlic butter in between each slice and fill with a slice of cheese. Bake another 3-5 minutes or until cheese is completely melted.
And finally, the dessert!!! Tried this with some Valentine m&ms!

Samoa Bars
10 tablespoons unsalted butter
1 cup packed dark brown sugar
1/4 cup granulated white sugar
1 large egg
2 teaspoons vanilla extract
1/4 teaspoon kosher salt
1 1/4 cups all-purpose flour
1 1/4 cups sweetened flaked coconut
1 1/4 cups mini M&M’s (I used regular m&ms - Valentine Day colors!)
a few extra M&M’s
Preheat oven to 350 degrees F. Spray 8x8-inch pan with nonstick spray and then line the bottom with parchment paper.
Heat butter in a small saucepan over medium heat until it browns and begins to smell nutty (watch it closely so it doesn’t burn). Let the butter cool for a few minutes, until just barely warm.
In a large mixing bowl, combine the browned butter and sugars. With a wooden spoon, stir in egg, vanilla and salt. Stir in flour, coconut and M&M’s until batter is blended.
Pour the batter into the prepared pan and smooth the top with a rubber spatula. Sprinkle a few additional M&M’s on top. Bake 25 to 30 minutes. Let the bars cool before turning them out onto a cutting board and slicing into squares (chilling them will make that process even easier).
http://foodwishes.blogspot.com/2008/02/end-of-chicken-parmesan-as-you-know-it.html
Baked Chicken Parmesan
2 Tbsp Olive Oil
2 Tbsp minced garlic
Hot Red Pepper Flakes (I used a Hot and Spicy Mix I found at World Market)
6 boneless skinless chicken breasts, or as many as fit in your baking dish
2 cups marinara sauce
1/4 cup chopped basil - I used about 2 tsp dried basil because I didn't have any fresh
8 oz shredded mozzarella
4 oz Parmesan cheese
1 pkg garlic croutons (5oz)
Preheat oven to 350. Mix the oil and garlic at the bottom of a 9 x13 baking dish - spread evenly out. Sprinkle in some red pepper flakes - you don't have to do this if you don't like the heat. Lay your chicken breasts in the baking dish and evenly cover with marinara sauce. Sprinkle with chopped basil. Add about half of your mozzarella and parmesan cheese followed by the croutons and the rest of the cheese.
Bake for 35-45 minutes or until thermometer in chicken read 150 (I think - maybe it's 170...I can't remember what chicken should be - check the tutorial I pasted above)


And of course, with the Baked Chicken Parmesan, I had to serve garlic bread. :)
This bread was fairly simple to make compared with some of the breads I have made. It does need to time to rise so I baked it the night before I made this dinner, and then warmed it in the oven right before dinner with the cheese.
Cheesy Garlic Bread
1 cup warm water
1 Tablespoon Honey
1 envelope Active Dry Yeast (2 1/4 Teaspoons) - I would recommend using the Quick Rise Yeast - just works better!
1 teaspoon Salt
3 cups Bread Flour
Olive Oil, For Greasing Surfaces (I just used the cooking spray)
⅓ pounds Sharp White Cheddar, Or Any Other Cheese You Prefer (I recommend this kind - or mozzarella/Parmesan works too!)
½ cups Garlic Butter (I made my own with melted butter and minced garlic, then I added a little Parsley and Basil)
In a large bowl, stir water, honey and yeast together. Let yeast proof 5 minutes - unless you're using the Quick Rise Yeast, then it doesn't need to proof. Once you know yeast is active, stir in salt and the flour in 1/4 cup increments. If you are using a stand mixer, be sure to not increase your speed higher than a 2 or ‘stir’. Once dough starts pulling away from the sides and the bowl seems to be pretty clean, set a timer for 5 minutes and walk away. Let the machine knead the dough. After 5 minutes, dough should be smooth and tacky but when touched shouldn’t leave any dough on your fingers.
Grease the bowl and the dough. Cover with plastic wrap or a kitchen towel and let rise 1 hour or until doubled in size.
Punch down dough and cut into two equal portions. Form into two long baguettes the length of the cookie sheet. I like to twist mine because it looks cool, but it also keeps its length and doesn’t shrink. Cover with plastic wrap and rise 30 minutes. Start to preheat oven to 400 degrees F and place dough close to the oven where it’s nice and warm. Once oven is preheated, remove plastic wrap, from the dough reduce oven to 350F, put the bread into the oven and bake 20 minutes.
In the meantime, slice the cheese into thin slices and melt the butter.
Pull loaves of bread out of the oven after 20 minutes and brush with the melted garlic butter. Bake another 5-7 minutes or until bread begins to turn a golden brown. Remove from oven and cool 15 minutes.
Cut 1-inch slices 3/4′s of the the way through the loaves. Brush garlic butter in between each slice and fill with a slice of cheese. Bake another 3-5 minutes or until cheese is completely melted.
And finally, the dessert!!! Tried this with some Valentine m&ms!

Samoa Bars
10 tablespoons unsalted butter
1 cup packed dark brown sugar
1/4 cup granulated white sugar
1 large egg
2 teaspoons vanilla extract
1/4 teaspoon kosher salt
1 1/4 cups all-purpose flour
1 1/4 cups sweetened flaked coconut
1 1/4 cups mini M&M’s (I used regular m&ms - Valentine Day colors!)
a few extra M&M’s
Preheat oven to 350 degrees F. Spray 8x8-inch pan with nonstick spray and then line the bottom with parchment paper.
Heat butter in a small saucepan over medium heat until it browns and begins to smell nutty (watch it closely so it doesn’t burn). Let the butter cool for a few minutes, until just barely warm.
In a large mixing bowl, combine the browned butter and sugars. With a wooden spoon, stir in egg, vanilla and salt. Stir in flour, coconut and M&M’s until batter is blended.
Pour the batter into the prepared pan and smooth the top with a rubber spatula. Sprinkle a few additional M&M’s on top. Bake 25 to 30 minutes. Let the bars cool before turning them out onto a cutting board and slicing into squares (chilling them will make that process even easier).
Saturday, February 4, 2012
Sausage Macaroni Skillet
One of Matt's favorite dishes and pretty simple to make.

Sausage Macaroni Skillet
1 lb bulk Italian sausage
1/4 cup chopped onion
1/4 cup chopped green pepper
1/4 cup chopped red pepper
2 cups uncooked elbow macaroni (I used whole wheat pasta)
2 cups water
1 cup chili sauce
1 can (5oz) evaporated milk
1/2 cup shredded cheddar cheese
In a large skillet, cook the sausage, onion, and peppers over medium heat until meat is no longer pink - drain. Add macaroni and water. Bring to a boil. Reduce heat; cover and simmer for 7-8 minutes or until pasta is tender. Stir in chili sauce and milk and bring to a boil. Reduce heat; simmer, uncovered, for 3-4 minutes or until heated through.
Remove from heat, sprinkle with cheese. Cover and let stand for 5 minutes or until cheese is melted.
Serve with a steamed vegetable like green beans to make a balanced meal. :)
Subscribe to:
Comments (Atom)